Software for Windows
Science with your Sound Card!


Features:
Oscilloscope
Spectrum Analyzer
8-Channel
Signal Generator
Spectrogram
Pitch Tracker
Pitch-to-MIDI
DaqMusiq Generator
(Free Music... Forever!)
Engine Simulator
LCR Meter
Remote Operation
DC Measurements
True RMS Voltmeter
Sound Level Meter
Frequency Counter
Period
Event
Spectral Event
Temperature
Pressure
MHz Frequencies
Data Logger
Waveform Averager
Histogram
Post-Stimulus Time
Histogram (PSTH)
THD Meter
IMD Meter
Precision Phase Meter
Pulse Meter
Macro System
Multi-Trace Arrays
Trigger Controls
Auto-Calibration
Spectral Peak Track
Spectrum Limit Testing
Direct-to-Disk Recording
Accessibility
Data Logger
Waveform Averager
Histogram
Post-Stimulus Time
Histogram (PSTH)
THD Meter
IMD Meter
Precision Phase Meter
Pulse Meter
Macro System
Multi-Trace Arrays
Trigger Controls
Auto-Calibration
Spectral Peak Track
Spectrum Limit Testing
Direct-to-Disk Recording
Accessibility
Applications:
Frequency response
Distortion measurement
Speech and music
Microphone calibration
Loudspeaker test
Auditory phenomena
Musical instrument tuning
Animal sound
Evoked potentials
Rotating machinery
Automotive
Product test
Contact us about
your application!
Arduino_Race_Timer Mini-App
- Introduction
- Features
- Operation
- Arduino_Race_Timer Macro Listing
Introduction:
The Arduino_Race_Timer macro mini-app is a demonstration of some of the features of the 0xFE Event / Race Timer function of the DaqPort Arduino Sketch that is included with Daqarta. It is deliberately not as sophisticated as the DaquinOscope or DC Chart Recorder mini-apps, which make extensive use of Custom Controls, Multitasking, and macro subroutines.
Here there are no controls at all; you edit variables at the start of the macro code to change operational modes, parameters, and pin usage. Instead of multitasking, it uses a simple loop to wait for data returns, while still allowing continuous display updates.
However, the result of these simplifications is that the code is all in one listing, making it much easier to understand and customize for your own purposes.
Features:
The Arduino_Race_Timer can time races with up to 6 contestants, reporting times and entrant names in the order they come in. Contestants can be people or animals running a foot race, or real or model cars in a drag race, soapbox derby, or pinewood derby, or any sort of race-type situation with separate start and end points and no multiple laps. Each contestant must have a separate lane with its own detector at the finish line.
Alternatively, you can use this as a reaction time race, where each contestant has to press or release a button as quickly as possible after receiving a signal. You can even use it with a single "contestant" to measure or train your own reaction time.
A typical display format looks like this, here for a reaction time race between two very old scientists. (You'll notice that the younger one is faster!):
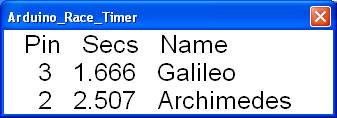
Times can be reported in seconds for short races, or hours/minutes/seconds (H:M:S) for longer races. Millisecond resolution is reported by default, but can easily be changed to microseconds. This allows for unconventional "races", such as lab or machine testing applications that time fast event sequences.
The race timer allows an external trigger signal to start the timing, or timing can start immediately when Arduino_Race_Timer is launched, or after a random delay.
The start of the race is indicated by a selectable Signal pin that can drive an external display such as an LED, or you can use the built-in LED on pin 13. Alternatively, you can use the Signal pin to drive a transistor and optional relay to provide a really bright start display.
Optional False Start detection allows a photosensor to abort a race if any entrant breaks a beam at the starting line before the official start.
The polarities of the Trigger input, the Signal output, the False Start detector, and the race event pins are assumed to be active when high, but any or all of these can optionally be changed to active low.
Operation:
The Arduino_Race_Timer macro mini-app is included with Daqarta. To run it, first hit CTRL+F8 to open the Macro Dialog. Then scroll the Macro List down and double-click on Arduino_Race_Timer. (There is no single-letter ID for Hot Key access, as there is for the mini-apps at the top of the list.)
Note that you can open this Help topic by selecting Arduino_Race_Timer as above, then clicking the Help button below the list, next to Run. Or, once you have opened the Edit dialog, you can click the duplicate Help button near the upper right.
Before you use Arduino_Race_Timer, you may want to change certain parameters that are set near the start of the macro. To edit these, single-click on Arduino_Race_Timer to select it without running it, then click the Edit button.
The relevant variables with their default values are:
Trigger Pin:
UT=11 ;Trigger pin number, 0 = no trig
You can set UT to any pin in the range of 8-12. Pins 2-7 are typically reserved for race contestants, but any pin in that range may be used for the Trigger if you don't need it for a contestant.
The above assumes that the trigger will be active high. To use an active low trigger, add h10 (decimal 16) to the pin number, as in UT=11 + h10.
When Arduino_Race_Timer starts, you will see "Waiting for trigger pin 11" on a Custom Meter display. That will persist until the trigger pin is made active, after which it will change to "RUNNING" and the Signal (see below) pin will be made active to indicate that the race has begun and timing is in progress.
If you set UT=0 no trigger will be expected. The race will start after a random delay from when you start Arduino_Race_Timer. The default delay is from 1 to 5 seconds. This is to prevent contestants who can see the person starting Arduino_Race_Timer from getting advance warning on the actual start. You can change the delay range by scrolling down into the code to find this line:
WaitSecs=rnd(1, 5) ;Random 1-5 sec delay
You can eliminate the random delay by commenting out this line with a leading semicolon.
False Start Detection:
UF=0 ;No false start beam
This option is unused by default. When active, it guards against false starts by contestants who "jump the gun". To use it you must arrange a light beam that passes across all lanes at the starting line just ahead of the contestants. The beam should be very narrow (such as that from a laser), and strike a photodetector such that any attempt to cross the starting line by any contestant will break the beam.
Connect the photodetector output to an unused pin, typically in the 8-12 range. Then set UF to the pin number. The detector is assumed to be a type that is active-high, meaning it produces a digital high when the beam hits it, and goes low when the beam is broken. If you are using pin 12, change the above line to:
UF=12 ;False start beam on pin 12, active-high
Many photodetectors use an open-collector phototransistor with a pull-up resistor, which means the the output is active-low: While the beam falls on the phototransistor it is on, pulling the output down to logical 0. When the beam is broken, the collector is pulled high and the output becomes logical 1. To use such an active-low device, add h10 to the UF value:
UF=12 + h10 ;False start beam on pin 12, active-low
If you have set UT=0 for no trigger, then as soon as the random delay is over, pin UF is tested just before the start of timing. If the beam is blocked (pin inactive), that means that one or more contestants is ahead of the starting line already. A false start is declared and the macro exits.
To use False Start detection with triggered operation, you must add h80 to the Trigger variable UT to tell the Arduino to expect the False Start variable UF, which is not sent otherwise:
UT=11 + h80 ;Trigger on pin 11, with False Start detection.
Signal Pin:
US=13 ;LED Signal on pin 13
The default Signal is on pin 13, which drives a small LED on the Arduino board. This is fine for testing, but for real-world use you will probably want to drive a separate LED. You can still use pin 13, ignoring the on-board LED and driving your own from that pin. If all you need is a remote signal, and an ordinary LED is conspicuous enough, just connect the (+) lead to the pin through a 220 ohm resistor, and the (-) lead to ground.
If you want something brighter, connect the pin to the base of an ordinary NPN transistor through a base resistor in the 1-10 kilohm range. Ground the emitter, and connect the collector to the low side of your bright display. The high side of the display should typically go to a separate power supply, unless you are powering the Arduino with its own supply instead of the USB port. Depending on the current drawn by the display, you may need to use a power transistor (with a lower-value base resistor) as the driver.
For AC-powered displays use a relay in the collector circuit, and connect that to apply power to the display. Put a 1N4004 or similar diode across the relay, with the arrow pointing to +5 V. This will block high-voltage inductive "kick" transient spikes from damaging the transistor.
You can use active-low polarity on the Signal via:
US=13 + h10 ;Active-low LED Signal on pin 13
If you do this, and you are driving an LED directly from the Signal pin (through a 220 ohm resistor), it should connect to the (-) lead, and the (+) lead should connect to +5 V. You can also use active-low to drive the base resistor of a PNP transistor whose emitter is connected to +5 and whose collector goes to a grounded relay or a bright display.
Event Bitmap:
UE=b00001100 ;Events on pins 2 and 3
The UE variable is a bitmap of the pins used to detect each contestant at the finish line. The default uses pins 2 and 3, as shown. Only pins 2-7 are allowed.
Bits 0 and 1 are used as flags. Bit 1 (b00000010) means the race will end as soon as the winner crosses the finish line, and no other times will be reported. The default used here will wait for all entrants to finish, with all times reported.
Bit 0 (00000001) can be set to indicate that all Event detectors will have active-low polarity; the default used here is active-high.
Note that there nust be a separate detector for each entrant; these can be individual microswitches, beams and photodectors, or anything that makes a reliable contact.
Maximum Wait Time:
UW=10 ;Max wait time for results
This is the duration, in integer seconds, at which the race will end even if some contestants haven't finished yet. Pin numbers, times, and names for those who have finished will be reported normally, while non-finishers will be listed last with pin numbers of 0, times of 0, and "(failed)" instead of a name. If there are any failures, a final line on the display will show "Failed 2 of 5 pins" (or whatever).
Arduino Timer Resolution:
UM=0 ;0=usec, 1=msec resolution
By default the Arduino_Race_Timer uses the highest resolution available on the Arduino, which returns values in microseconds. (The actual values have steps of 4 or more microseconds, however.) The highest value that can be returned is 2147483647, so if it is microseconds the maximum interval is about 35.8 minutes.
If you set UM=1 the timer will count milliseconds, and the maximum interval will be 596.5 hours. This does not affect the time display format (see below).
Race Time Display Format:
UH=0 ;0=secs, 1=H:M:S time display
By default, race times are reported in seconds, with 3 decimal places. By setting UH=1 times will be shown in H:M:S format, also with 3 decimal places on the seconds. These are not affected by the Arduino timer resolution set via UM.
If you are using the default microsecond timer resolution, you can increase the display resolution by manually changing the display code near the end of the macro. The relevant lines are:
    IF.UH=0                 ;Show seconds?
        Mtr0=Mtr0 + n + b2 + UN + b3+ T + b3 _
             + Str7[20*QN]
    ELSE.                   ;Else show H:M:S
        Mtr0=Mtr0 + n + b2 + UN + b3+ T(T.3) + b3 _
            + Str7[20*QN]
    ENDIF.
The time (in seconds) is held in floating-point variable T. The default display format for a floating point variable is 3 decimal places, as used above in the first (seconds) branch of the IF statement. To increase that to 6 places (microseconds) you would change the above code to use T(0.6) instead of just T.
The second (H:M:S) branch above uses Time Display Format, as indicated by the second T in T(T.3) above. To change that to 6 places use T(T.6) instead.
See Decimal Display Format and Time Display Format under String Variables and Expressions.
Initial Display Font:
Mtr0="<F(30)" ;Initial meter font size
This sets the default display font to 30 pixels. You can change the default by replacing the '30' with another font size. If you want to change the size while the window is displayed, you can drag its lower border or corner until you get the desired text size.
Contestant Names:
Str7= ;Clear Str7 text Str7[0]="Archimedes" ;Pin 2 contestant name Str7[20]="Galileo" ;Pin 3 contestant Str7[40]="Newton" ;Pin 4 contestant Str7[60]="Maxwell" ;Pin 5 contestant Str7[80]="Einstein" ;Pin 6 contestant Str7[100]="Feynman" ;Pin 7 contestant Str7[120]="(failed)" ;Failed contestant label
These quoted strings hold the names of up to 6 contestants, on Arduino digital pins 2-7. Each string can hold up to 19 characters, but they don't need to be limited to names; you can include entry numbers or anything else that will fit.
Arduino_Race_Timer Macro Listing:
;<Help=H4926

UT=11               ;Trigger pin, 0 = no trig
UF=0                ;No false start beam
US=13               ;LED Signal on pin 13
UE=b00001100        ;Events on pins 2 and 3 (bitmap)
UW=10               ;Max wait time for results, secs
UM=0                ;0=usec, 1=msec resolution
UH=0                ;0=secs, 1=H:M:S time display
Mtr0="<F(30)"       ;Initial meter font size

Str7=                  ;Clear Str7 text
Str7[0]="Archimedes"   ;Pin 2 contestant name
Str7[20]="Galileo"     ;Pin 3 contestant
Str7[40]="Newton"      ;Pin 4 contestant
Str7[60]="Maxwell"     ;Pin 5 contestant
Str7[80]="Einstein"    ;Pin 6 contestant
Str7[100]="Feynman"    ;Pin 7 contestant name
Str7[120]="(failed)"   ;Failed contestant label

Mtr0="<<Arduino_Race_Timer"    ;Meter title
Posn#0="Ardu"       ;Specify Arduino only
Posn#1=0            ;Device count, 0 = first found
@_ComDev_Scan       ;Find and open device port

QT=UT & 15         ;Remove flags in high nybble
QF=UF & 15
QS=US & 15
Port#D2=h42D0 + QT     ;Enable Trigger pin UT for PULLUP INPUT
Port#D2=h42D0 + QF     ;Enable False Start pin for PULLUP INPUT
Port#D2=h41D0 + QS     ;Enable Signal pin US for OUTPUT (LED)

Port=$(hD0 + QS) + $(US>>4 & 1)     ;Signal OFF at start

UI=2                       ;Starting pin to test
QC=0                       ;Pin counter
WHILE.UI=<8            ;Test pins 2-7
    IF.((UE>>UI)&1=1       ;Using pin UI?
        QC=QC+1                ;Count event pin
        Port#D2=h42D0 + UI     ;Event PULLUP INPUT
        Port#D1=hB0 + UI       ;Read event pin
        UA=Port?1
        IF.UA=!(UE & 1)        ;Already active?
            Mtr0="Event pin " + UI + " not ready." _
                +n + "Make pin inactive and restart timer."
            Port#O=0            ;Close port
            LoopBreak=0         ;Exit macro
        ENDIF.
    ENDIF.
    UI=UI+1                 ;Next pin number
WEND.                   ;Do all pins

Port=$(hF0) + "W" + $w(-UW)     ;Trigger timeout = UW sec

IF.QT=0                         ;No trigger mode?
    Mtr0="WAIT FOR SIGNAL"
    WaitSecs=rnd(1, 5)             ;Random 1-5 sec delay
    QE=UE & hFD                    ;Isolate Event bits
    QQ=0                           ;Assume no false starts
    IF.QF=>0                       ;False-start beam used?
        Port#D1=hB0 + QF               ;Read photodetector
        UA=Port?1
        IF.UA=((UF >> 4) & 1)          ;Beam broken?
            QQ=1                           ;False start if so
        ENDIF.
    ELSE.                          ;Else check that no events yet
        Port#D1=hB0                    ;Read bits 0-7 (PIND)
        UA=Port?1
        UA=UA & QE                     ;Consider only Event bits
        IF.(UE & 1)=0                  ;Active-high Events?
            IF.UA=>0                       ;Any high bits?
                QQ=1                           ;False start if so
            ENDIF.
        ELSE.                          ;Else active-low
            IF.UA=!QE                      ;Any bits *not* same as Event?
                QQ=1                           ;False start if so
            ENDIF.
        ENDIF.
    ENDIF.
    IF.QQ=1                        ;False start detected?
        Mtr0="FALSE START... aborting."
        Port#O=0                       ;Close port
        LoopBreak=0                    ;Exit macro
    ENDIF.
    Mtr0="START"                   ;Timing starts NOW (overwritten)
ELSE.                           ;Else trigger mode
    Port#D1=hB0 + QT               ;Read trigger pin
    UA=Port?1
    IF.UA=!((UT>>4) & 1)           ;Already active?
        Mtr0="Trigger pin " + QT +" not ready."
        IF.(UT & h20)=0                ;No wait in 0xFE?
            Mtr0=Mtr0 +n + "Make pin inactive and restart timer."
            Port#O=0                        ;Close port
            LoopBreak=0                     ;Exit macro
        ELSE.                          ;Else 0xFE waits for ready
            Mtr0=Mtr0 +n + "Make pin inactive, then active to start timing."
        ENDIF.
    ELSE.
        IF.QF=>0                       ;False-start beam used?
            Port#D1=hB0 + QF               ;Read photodetector
            UA=Port?1
            IF.UA=((UF >> 4) & 1)          ;Beam broken?
                Mtr0="FALSE START... aborting."
                Port#O=0                       ;Close port
                LoopBreak=0                    ;Exit macro
            ENDIF.
         ELSE.
            Mtr0="Waiting for trigger pin " + QT
        ENDIF.
    ENDIF.
ENDIF.

IF.QT=>0           ;If Trigger...
AND.QF=>0          ;...AND False-start beam in use
    Port=$(hFE) + $(UT + h80) + $(US + h40 + h20*UM) _
    + $(UE) + $(UF)
ELSE.
    Port=$(hFE) + $(UT) + $(US + h40 + h20*UM) + $(UE)
ENDIF.

Port#Ti=1               ;Return immediately if no data
Port#Tm=1
Port#Tc=0
Port#T=2                ;Use timeouts

UN=0
WHILE.UN=<(UW / 10m)    ;Test for results every 10 msec
    WaitTrace=              ;Short delay
    U0=Port?5               ;Try to read data
    UC=Port?c               ;Num chans from above
    IF.UC=13                ;Special flag = trigger found?
        Mtr0="RUNNING"
    ELSE.                   ;Else not a trigger
        IF.Port?n=!0            ;Any bytes read?
            LoopBreak=2             ;OK if so
        ELSE.
            WaitTrace=              ;Else update trace
        ENDIF.
    ENDIF.
    UN=UN+1                ;Next 10 msec test
WEND.

Port#T=0               ;COM timeouts off

Port#D1=h87            ;Get timeout count
Q7=Port?2

IF.UC=0                    ;No results?
    Mtr0="EVENT TIMEOUT - NO RESULTS."
    Port#O=0                   ;Close port
    LoopBreak=0                ;Exit macro
ENDIF.

IF.UC=14                   ;False start?
    Mtr0="FALSE START... aborting."
    Port#O=0                   ;Close port
    LoopBreak=0                ;Exit macro
ENDIF.

IF.UC=15                   ;Trigger timeout?
    Mtr0="TRIGGER TIMEOUT... aborting."
    Port#O=0                   ;Close port
    LoopBreak=0                ;Exit macro
ENDIF.

IF.UH=0                 ;Show seconds?
    Mtr0="Pin" + b3 + "Secs" + b3 + "Name"
ELSE.                   ;Else show H:M:S
    Mtr0="Pin" + b7 + "Time" + b9 + "Name"
ENDIF.

UC=0                    ;Count of null times
UI=0
WHILE.UI=<QC            ;Do all pin results
    Port#D1=h80 + UI        ;Bit pattern of first hit
    Q0=Port?2
    UN=log2(Q0)             ;Get pin number
    IF.UN=<0                ;Max neg if Q0=0
        UN=0
    ENDIF.
    Port#D1=h90 + UI        ;Get time for this result
    U0=Port?4
    QN=UN - 2               ;Pin number to name index
    IF.U0=0                 ;Failed, no time?
    OR.QN=<0                ;OR UN pin < 2?
        UC=UC+1                 ;Count failure
        QN=6                    ;Label number for failure
        UN=0                    ;Failed "pin number"
    ENDIF.
    IF.UM=1                     ;msec Arduino timing?
        T=U0 / 1000                 ;msec to sec
    ELSE.                       ;Else usec default
        T=U0 / 1M                   ;usec to sec
    ENDIF.
    IF.UH=0                 ;Show seconds?
        Mtr0=Mtr0 + n + b2 + UN + b3+ T + b3 _
             + Str7[20*QN]
    ELSE.                   ;Else show H:M:S
        Mtr0=Mtr0 + n + b2 + UN + b3+ T(T.3) + b3 _
            + Str7[20*QN]
    ENDIF.
    UI=UI+1                 ;Next pin
WEND.

IF.Q7=>0                    ;Any timeouts?
    Mtr0=Mtr0 + n + "Failed " + UC + " of " +QC +" pins"
ENDIF.

Port#O=0
See also DaqPort Arduino Sketch, USB / Serial Communications Port Access
- Back to DaqPort Arduino Sketch
- Ahead to Arduino_Counter Mini-App
- Daqarta Help Contents
- Daqarta Help Index
- Daqarta Downloads
- Daqarta Home Page
- Donate to Daqarta
Questions? Comments? Contact us!
We respond to ALL inquiries, typically within 24 hrs.INTERSTELLAR RESEARCH:
Over 45 Years of Innovative Instrumentation
© Copyright 2007 - 2026 by Interstellar Research
All rights reserved